How to Build a Multi-Vendor Ecommerce Marketplace
TL;DR
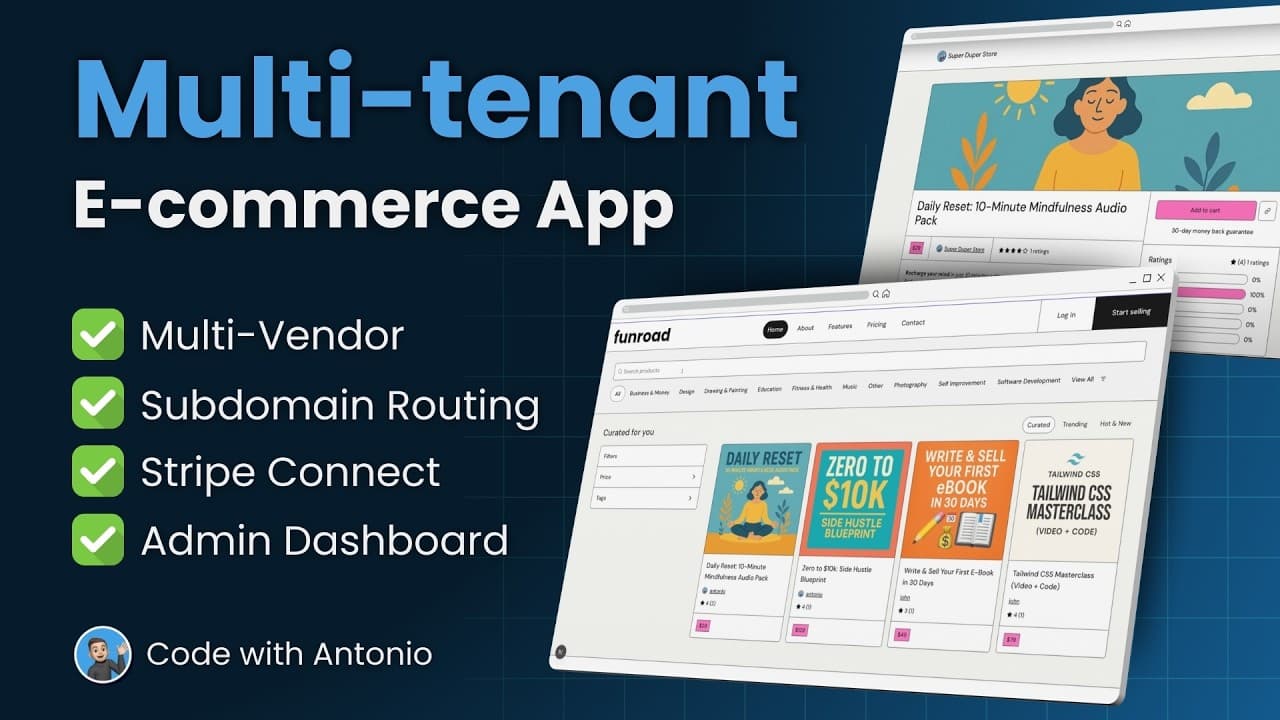
Build the marketplace with Next.js 15, Payload, Stripe Connect, MongoDB, Tailwind CSS 4, and vendor-specific subdomains. Each merchant receives an isolated storefront and dashboard, while Stripe Connect routes vendor payments and automatically gives the platform a 10% transaction fee. Customers can purchase digital products, access them through a personal library, view bonus content, and submit ratings or written reviews.
Transcript
Hey there, my name is Antonio and in this tutorial we are building a multi-tenant e-commerce application. Right now we are looking at the public storefront. Each product here is sold by a different merchant. Everything's categorized cleanly and we have a slick drop-own menu for subcategories. When a customer clicks on a product, they get taken to a... Read More
Key Insights
- A multi-tenant marketplace is structured around isolated merchant storefronts, with every seller receiving a branded experience on a unique subdomain. The central storefront can display products from different merchants, while a vendor storefront filters the catalog to products belonging only to that seller.
- Stripe Connect is responsible for the marketplace payment flow, including merchant verification and payment distribution. After a successful Stripe Checkout transaction, the vendor receives payment and the platform automatically collects a 10% fee, creating a built-in revenue model for the marketplace operator.
- The customer library is the post-purchase destination for purchased digital products. Customers can open a product, access creator-provided bonus content, and submit a rating or written review, giving the marketplace both a delivery mechanism and a structured customer feedback system.
- Bonus content is stored in a rich-text content block that gives merchants flexibility over digital fulfillment. A seller can use the block for a file download, welcome message, license code, link, or another type of information that customers should receive after purchasing the product.
- Role-based access control is the foundation of administrative isolation. Vendors can manage only their own products and related information, while the super administrator retains access to platform-wide entities such as users, products, orders, tenants, and other marketplace records.
- The merchant dashboard is powered by Payload and supports routine catalog management. Vendors can create and update products, set prices, edit descriptions, assign categories, and upload content, but they must complete Stripe verification before they can begin creating marketplace items.
- The project setup uses Next.js 15.2.4 with React 19, React DOM 19, TypeScript, ESLint, Tailwind CSS 4, a source directory, and the App Router. Turbopack is left disabled to match the environment originally used during development, and the default import alias remains unchanged.
- Bun is the tutorial’s preferred package manager because it provides fast package installation, a bunx equivalent to npx, and zero-configuration execution for TypeScript scripts with ES6 imports. The tutorial still recognizes npm, pnpm, and Yarn as alternative package-management options.
Install to Summarize YouTube Videos and Get Transcripts
Explore YouTube Video Summarizer or Get YouTube Transcript Extractor
Questions & Answers
Q: How does a multi-vendor marketplace isolate each seller’s storefront?
Each seller receives a branded public storefront on a unique vendor-specific subdomain. The main marketplace can show products sold by different merchants, but an individual vendor storefront filters its catalog to that merchant’s products. The merchant dashboard follows the same isolation principle, allowing vendors to manage only their own data while the super administrator retains platform-wide access.
Q: How does Stripe Connect handle marketplace payments and fees?
Stripe Connect powers the payment flow behind Stripe Checkout. Before selling, merchants complete Stripe verification through the dashboard. When a customer successfully purchases a product, the vendor gets paid and the marketplace automatically takes a 10% transaction fee. This arrangement connects merchant onboarding, payment distribution, and the platform’s revenue model within the application.
Q: What can customers do after purchasing a digital product?
After a successful purchase, the product appears in the customer’s personal library. From there, the customer can open the product, access bonus content uploaded by its creator, leave a rating, or write a review. The bonus content supports rich text and may contain a file download, welcome message, license code, link, or other seller-provided information.
Q: What can vendors manage through the merchant dashboard?
Vendors use the Payload-powered merchant dashboard to manage their marketplace presence and product catalog. They can create products, set prices, update descriptions, assign categories, and upload supporting content or images. Before creating marketplace items, a vendor must complete Stripe verification through the dashboard. Access controls keep each merchant restricted to data associated with that merchant.
Q: What does the super admin dashboard control?
The super admin dashboard provides access to platform-wide entities, including users, products, orders, tenants, and other marketplace records. Its role differs from the merchant dashboard because it is not limited to a single vendor’s data. This structure demonstrates role-based access control, keeping merchant operations isolated while allowing the administrator to maintain full control over the platform.
Q: How should the Next.js project be configured for the tutorial?
The setup uses create-next-app version 15.2.4 with TypeScript, ESLint, Tailwind CSS, and a source directory enabled. The App Router must also be enabled because it is described as crucial to the project. Turbopack is left disabled to match the original development environment, and the standard at-sign import alias is kept without modification.
Q: Why does the tutorial use Bun instead of npm or pnpm?
Bun is chosen primarily for package-installation speed, its bunx command, and its ability to run TypeScript scripts with ES6 imports using zero configuration. The tutorial describes pnpm as a strong alternative but reports faster results with Bun. It also notes that Bun may warn about problematic peer dependencies in situations where npm produces an installation error.
Q: What features are included in the multi-tenant ecommerce project?
The project includes a public multi-vendor catalog, categories, subcategories, product filtering, search, vendor-specific subdomains, branded merchant storefronts, Stripe Connect payments, automatic platform fees, merchant verification, customer purchase libraries, product ratings, written reviews, bonus content, file delivery, image uploads, merchant administration, super administration, and role-based access control through a Next.js 15 and Payload application.
Summary & Key Takeaways
-
The project is a multi-tenant marketplace for digital products in which every merchant receives a branded storefront on a unique subdomain. The public marketplace organizes products by category and subcategory, while each vendor storefront filters the catalog to that merchant’s products and keeps the merchant’s data isolated from other sellers.
-
Stripe Connect powers checkout, vendor verification, payment distribution, and the marketplace revenue model. When a customer completes a purchase through Stripe Checkout, the relevant vendor gets paid and the platform automatically collects a 10% transaction fee. Customers can return to a merchant storefront and add more products from the same vendor before checkout.
-
Next.js 15 provides the application foundation, with Payload powering merchant and super admin dashboards. Vendors manage products, prices, descriptions, categories, bonus content, and image uploads after completing Stripe verification. Role-based access control restricts merchants to their own data, while super administrators can manage users, products, orders, tenants, and other platform entities.
Read in Other Languages (beta)
Share This Summary 📚
Summarize YouTube Videos and Get Video Transcripts with 1-Click
Try YouTube Summary with ChatGPT & Claude or YouTube Transcript Generator
Explore More Summaries from Code With Antonio 📚
Summarize YouTube Videos and Get Video Transcripts with 1-Click
Try YouTube Summary with ChatGPT & Claude or YouTube Transcript Generator