10 Best YouTube Videos to Learn Video Editing (DaVinci Resolve & After Effects)

Aug 08, 2026
13 min read
23 views
Last updated: August 2026
This list collects 10 YouTube videos that take you from opening DaVinci Resolve for the first time to building polished motion graphics in After Effects. It is written for self-taught editors who want one clear path through both editing and motion design instead of a pile of disconnected tutorials.
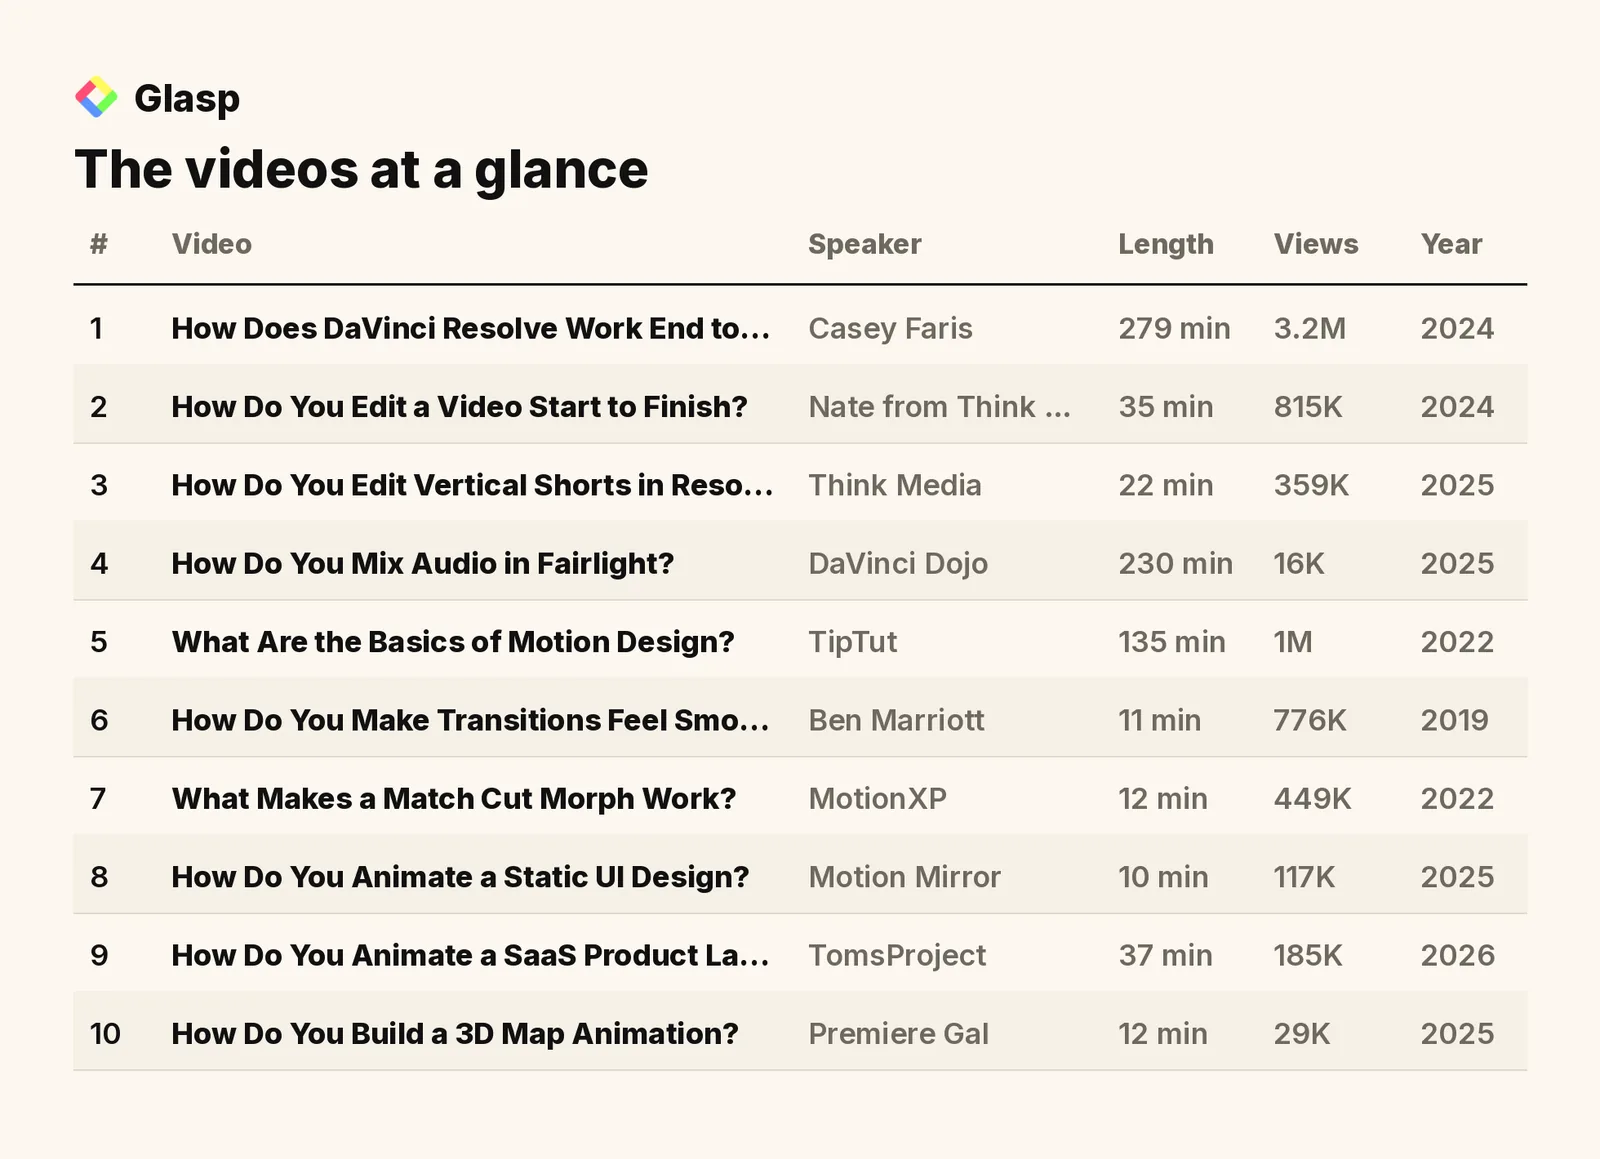
The full set runs 783 minutes, about 13 hours of instruction, anchored by full-length courses from Casey Faris, DaVinci Dojo, and TipTut alongside focused lessons from Think Media, Ben Marriott, and Premiere Gal. Together they cover editing, audio, transitions, UI animation, and 3D, which is why this set works as a complete curriculum.
The videos on this list, in the order to watch them, are:
How Does DaVinci Resolve Work End to End? (Casey Faris)
How Do You Edit a Video Start to Finish? (Nate from Think Media)
How Do You Edit Vertical Shorts in Resolve? (Think Media)
How Do You Mix Audio in Fairlight? (DaVinci Dojo)
How Do You Make Transitions Feel Smooth? (Ben Marriott)
What Makes a Match Cut Morph Work? (MotionXP)
How Do You Animate a Static UI Design? (Motion Mirror)
How Do You Animate a SaaS Product Launch? (TomsProject)
How Do You Build a 3D Map Animation? (Premiere Gal)
Total: 10 videos, 783 minutes of watch time (13 hours 3 minutes), and 7M combined views.
1. How Does DaVinci Resolve Work End to End?

"Introduction to DaVinci Resolve - [Full Course] for Beginners (2024)" · Casey Faris · 279 min · 3.2M views · 2024
In short: Resolve's pages run left to right in workflow order: Media, Cut, Edit, Fusion, Color, Fairlight, and Deliver, covering import through final render.
Start here because this full course maps the entire post-production pipeline inside one application. Casey Faris explains what each page of Resolve does and in what order real work happens, so everything later in this list has a mental home. It also settles the free versus Studio question before you spend anything.
Key takeaways
DaVinci Resolve handles importing, editing, effects, color grading, audio mixing, and rendering inside a single application instead of spreading the workflow across multiple apps.
The free version of Resolve includes advanced color tools, Fusion effects, and Fairlight mixing with no watermarks and full permission for commercial work.
Resolve Studio costs $295 as a one-time purchase, adds 10-bit video support and resolutions beyond 4K, and updates are free after buying a license.
A mid-range gaming PC with a strong graphics card, or a later Mac such as an M1 or M2, is a genuine prerequisite for a good Resolve experience.
Watch on YouTube · Read the summary and Q&A
2. How Do You Edit a Video Start to Finish?
"How to Edit A Video in DaVinci Resolve! (Start to Finish)" · Nate from Think Media · 35 min · 815K views · 2024
In short: Organize A-roll and B-roll into folders, import that structure, trim the main footage, then layer supporting visuals over the cuts.
Once you know the interface, this is the video that turns knowledge into a finished YouTube edit. Nate compresses the lessons of more than 200 edited videos into 35 minutes, from folder organization through music, text, and color correction. It is the fastest way to complete your first real project.
Key takeaways
Separating A-roll and B-roll into folders before importing keeps the media pool organized and prevents confusion once the edit begins.
The Command B shortcut and the blade tool make precise cuts, and in and out points speed up trimming the main footage.
B-roll layered over cuts smooths jump cuts and adds visual context, producing a more polished final video for the audience.
Adjusting exposure, contrast, saturation, and EQ settings improves both picture and sound, and music volume should complement rather than overpower the content.
Watch on YouTube · Read the summary and Q&A
3. How Do You Edit Vertical Shorts in Resolve?

"How to Edit Shorts & Reels in DaVinci Resolve (Start to Finish)" · Think Media · 22 min · 359K views · 2025
In short: Switch the timeline to vertical resolution before cutting, then trim A-roll with Command B and layer B-roll using in and out points.
Short-form video has its own setup traps, and this walkthrough removes them. It shows the timeline-level vertical setting most beginners miss, plus how to rescue horizontal footage for a 9:16 frame. It builds directly on the previous video's workflow, so the two make a natural pair.
Key takeaways
Vertical framing in Resolve is set at the timeline level by unchecking Use Project Settings and selecting Use Vertical Resolution for a 9:16 frame.
Deleting a bad take leaves an empty gap that must be deleted separately so the remaining clips play back seamlessly.
Shooting horizontally and converting to vertical later allows repositioning in the Inspector with zoom and position controls, a freedom natively vertical footage does not offer.
Copying video attributes with Command C and Option V applies one framing fix across every clip on the timeline at once.
Watch on YouTube · Read the summary and Q&A
4. How Do You Mix Audio in Fairlight?

"Complete DaVinci Resolve Audio Course | FREE Fairlight Training" · DaVinci Dojo · 230 min · 16K views · 2025
In short: Fairlight mixing starts with sound fundamentals: amplitude controls loudness, frequency controls pitch, and decibels measure intensity on a logarithmic scale.
Audio is where most self-taught edits fall apart, and this free Fairlight course closes the gap. It grounds the interface, clip and track edits, automation, buses, and loudness delivery in how sound actually behaves. Watch it after you can cut a video and your work will immediately sound more professional.
Key takeaways
Amplitude determines how loud a sound is and appears as waveform height in Resolve, while frequency measured in hertz determines its pitch.
Human hearing typically spans 20 hertz to 20,000 hertz, so audio work in Fairlight concentrates on that range rather than frequencies outside it.
Decibels are a logarithmic unit, so a sound at 40 decibels is considerably more than twice as loud as one at 20 decibels.
Track level adjustments affect every clip on that track, while clip level adjustments change only one piece of audio, a distinction that decides where effects belong.
Watch on YouTube · Read the summary and Q&A
5. What Are the Basics of Motion Design?

"Complete Intro to Motion Design | FULL AFTER EFFECTS COURSE" · TipTut · 135 min · 1M views · 2022
In short: Build a composition first, drop in a reference image locked at 10 percent opacity, and convert text to shapes so letters animate separately.
This is the bridge into After Effects: a full beginner motion design course built around one social media animation. TipTut introduces compositions, solids, opacity, anchor points, and text-to-shape conversion in the order you actually need them. Finish it and the rest of the After Effects videos here will make sense.
Key takeaways
A composition is the required container in After Effects, and assets from the project window must be dragged into its timeline before any work can happen.
A frame rate of 30 frames per second means 30 different pictures per second of footage, used here with a 10 second duration.
Ctrl+Y creates a new solid layer, and the T shortcut reveals opacity so a reference image can sit faintly visible at 10 percent.
Choosing Create, then Shapes from Text converts editable type into vector outlines so individual letters can be squashed, stretched, and stroked.
Watch on YouTube · Read the summary and Q&A
6. How Do You Make Transitions Feel Smooth?

"After Effects Smooth Transitions - Animation Tutorial pt. 1" · Ben Marriott · 11 min · 776K views · 2019
In short: Smooth transitions come from mastering the graph editor and shaping motion yourself rather than relying on easing plugins.
Eleven minutes that teach the single most important animation habit: controlling easing in the graph editor instead of outsourcing it to plugins. Ben Marriott dissects one transition in detail, down to layer organization and an animated liquid pour. It is short, but the skill it builds carries through everything after it.
Key takeaways
Focusing on animation skill without relying on plugins leads to significant improvement, because the graph editor gives direct control over how motion accelerates.
The CC Toner effect provides more control and variety in color correction than the alternative effects covered in the video.
Animating a cup top with the size property instead of the scale property keeps stroke width consistent during the move.
The tutorial breaks down its first transition step by step, covering color correction, layer organization, and animating a coffee cup and liquid pour.
Watch on YouTube · Read the summary and Q&A
7. What Makes a Match Cut Morph Work?

"After Effects morph transition...with match cuts" · MotionXP · 12 min · 449K views · 2022
In short: A match cut animates one object into another's position, then cuts at the fastest point of motion where the eye cannot track the change.
With graph editor skills in hand, this video shows how professionals fake complex morphs with a simple cut. It proves the match cut version of a square-to-circle morph looks identical to a laborious tween while using far less work. The parenting and trimming techniques transfer to almost any transition you will build.
Key takeaways
A match cut is a film technique that joins scenes by matching action or subject matter, and 2001: A Space Odyssey is a notable example.
The correct place to cut is the peak of the graph editor curve, the single fastest moment in the animation.
Alt plus the right and left bracket keys trim a layer's out and in points, butting the outgoing and incoming layers together at the cut.
A null object created under Layer, New, Null Object works as a reusable match cut controller once both objects are parented to it.
Watch on YouTube · Read the summary and Q&A
8. How Do You Animate a Static UI Design?

"After Effects UI Animation Tutorial | Motion Graphics " · Motion Mirror · 10 min · 117K views · 2025
In short: Isolate elements with rectangle masks and alpha mattes, convert the layers to 3D, and keyframe a parented camera null for the move.
This tutorial moves you from abstract shapes to a real-world deliverable: bringing a static interface design to life. It combines masks, 3D layers, camera moves, and finishing effects like shadows, blur, and glow into one 10 minute workflow. The technique is versatile enough to reuse across many client-style projects.
Key takeaways
Rectangle masks and track mattes isolate individual parts of a static design so each element can be animated on its own.
The main camera move uses 30 degrees of X rotation, 25 degrees of Y rotation, and 80 scale on a parented camera null.
Easy ease and graph adjustments smooth the keyframe transitions, while drop shadows and fast blur add depth to the composition.
An expression automates the slider-controlled number change, handling an animation task that would be tedious to keyframe by hand.
Watch on YouTube · Read the summary and Q&A
9. How Do You Animate a SaaS Product Launch?
"Master SaaS Motion Graphics in 30 Minutes (After Effects)" · TomsProject · 37 min · 185K views · 2026
In short: Start with a gradient background at 100 percent jitter, build a rounded rectangle UI card, then parent everything to a null and keyframe scale.
A current, commercially useful application of everything so far: the polished product animation style SaaS companies pay for. TomsProject builds the gradient background, UI card, text animation, and zoom-out reveal from scratch, including manual bounce without plugins. It is the portfolio-piece video of this list.
Key takeaways
Setting jitter to 100 percent on the four color gradient effect removes banding in the background and adds a light noise texture.
A convincing UI card uses a white rounded rectangle with roundness around 60, a light gray stroke, and a 5 percent opacity drop shadow at 90 degrees.
Bounce can be created manually by easing keyframes with F9, then dragging the graph editor handles out and overshooting the final scale value.
Setting the text range selector to Words makes copy arrive word by word, and enabling motion blur early immediately improves the polish of the movement.
Watch on YouTube · Read the summary and Q&A
10. How Do You Build a 3D Map Animation?

"Easy 3D Map Animation for Beginners in After Effects!" · Premiere Gal · 12 min · 29K views · 2025
In short: Rotate a 3D map minus 90 degrees on the X axis so it lies flat, then orbit a camera parented to a null around it.
The finisher: a full 3D scene with cameras, parallax, an animated travel route, and a GLB airplane model. Premiere Gal keeps it beginner-friendly while introducing the camera rigging and renderer concepts that unlock 3D work in After Effects. Completing it means you have touched every major skill in this list.
Key takeaways
Rotating the map layer minus 90 degrees on the X axis lays it flat like a table, and every other element is positioned relative to that surface.
Parenting a 3D camera to a null named camera aim lets you orbit by rotating the null while the camera stays pointed at the map.
Trim paths animates the route by keyframing the end parameter from 0 to 100, and pasting the line's path into the plane's position generates curved keyframes.
3D models such as GLB files only work under the advanced 3D renderer, so compositions set to classic 3D must switch renderers first.
Watch on YouTube · Read the summary and Q&A
Frequently asked questions
Is DaVinci Resolve free to use?
Yes, the free version of DaVinci Resolve handles nearly everything, including advanced color correction, Fusion effects, and Fairlight audio mixing, with no watermarks and full permission for commercial work. Resolve Studio is a $295 one-time purchase that adds extras like 10-bit support and AI-driven effects.
Should I learn DaVinci Resolve or After Effects first?
Learn DaVinci Resolve first if your goal is editing complete videos, since it covers cutting, color, audio, and delivery in one app, then move to After Effects for motion graphics and animation. This list is ordered exactly that way.
What computer do I need to run DaVinci Resolve?
A capable system is a genuine prerequisite: something like a mid-range gaming PC with a strong graphics card, or a later Mac such as an M1 or M2. Resolve consumes resources, and an underpowered computer produces a bad experience.
How long does it take to watch all 10 videos?
The full list runs 783 minutes, roughly 13 hours, with the two longest entries being the Casey Faris Resolve course at 279 minutes and the Fairlight audio course at 230 minutes. Spreading it over a few weeks alongside practice projects works well.
Do I need plugins to make smooth animations in After Effects?
No. Ben Marriott's transition tutorial is built on mastering the graph editor instead of easing plugins, and the SaaS motion graphics tutorial shows how to create bounce manually with F9 easing and overshot keyframes.
Which video should I watch first if I have never edited before?
The best starting point is the end to end DaVinci Resolve walkthrough, followed by the video that edits a project from start to finish, since those two cover the full workflow before any specialist technique. The motion design, transition and 3D animation videos make far more sense once that base is in place.
Is this list for beginners or for experienced editors?
It works for both because it moves in order of difficulty: the early videos cover DaVinci Resolve fundamentals like a complete edit and audio mixing in Fairlight, while the later ones go into motion design, match cut morphs, animated UI and 3D map animation. Beginners can stop after the Resolve section, and experienced editors can skip straight to the motion work.
Can I learn to edit vertical videos for TikTok, Reels and Shorts from this list?
Yes, one of the ten videos is dedicated to editing vertical shorts in DaVinci Resolve, so short form creators get a format specific workflow rather than a horizontal edit cropped down. Pairing it with the audio mixing video covers most of what a short form channel needs.
What should I practice after watching all ten videos?
The fastest way to retain any of it is to rebuild one project per skill: cut a short vertical edit, mix its audio in Fairlight, then animate a static UI mockup and a simple map sequence. Watching passively teaches the interface, but rebuilding the exercises is what turns the techniques into habits.
How to use this list
Watch these in order: the list is built as a learning path that starts with editing fundamentals in DaVinci Resolve, adds audio, then moves into After Effects from basic compositions to a full 3D scene. If you are short on time, start with Think Media's start-to-finish edit, since 35 minutes there gets you from raw footage to a finished video, then return to the Casey Faris course when you can commit to the fundamentals. Pause each video and rebuild what you see with your own footage, because the techniques only stick once you have run them with your own hands.
💡 Want summaries and transcripts for any YouTube video? Try YouTube Summary with ChatGPT & Claude.