How to Draw with Your 3D Printer Using a Pen
TL;DR
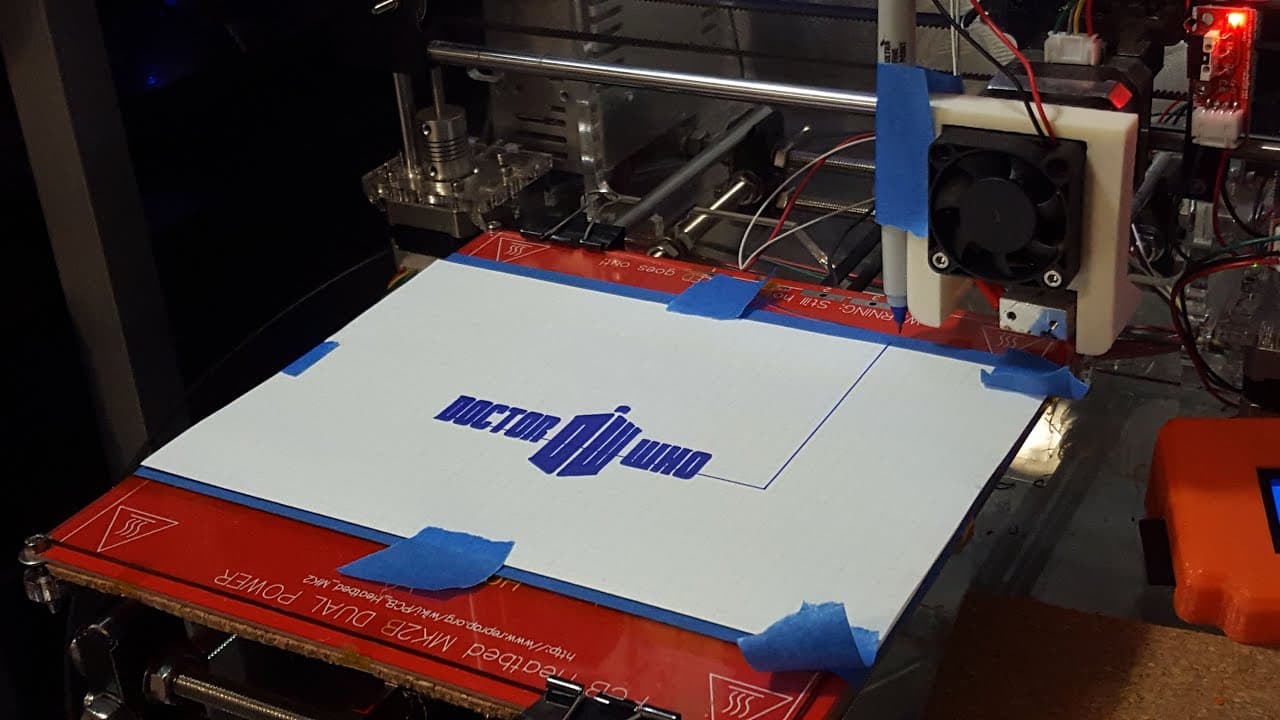
To draw with a 3D printer, start by converting a 2D image into an STL file using a 2D to STL converter. Load the STL into Cura to configure print settings like retraction and layer height. Finally, secure the pen at the correct height using tape, then pause the print to align and begin drawing accurately.
Transcript
okay so let's get started we're gonna need a couple of applications first one which is this 2d to STL converter and this wouldn't actually take your image and then convert it into a 3d object so you could print we're not printing anything but we're gonna need the stencil basically from the image itself then I'm using cura so you could download Keir... Read More
Key Insights
- 🤗 A 2D to STL converter is pivotal for transforming flat images into 3D models for pen-based printing.
- 👤 Cura is a recommended slicer for adjusting various print settings, making it user-friendly and versatile.
- 🤗 Settings like retraction and layer height need to be configured for effective drawing with the pen.
- 🤗 Proper alignment and setup for the pen are crucial to prevent damage to the surface or inaccurate prints.
- 🤕 Users may need to experiment with settings to address unexpected issues like the print head dragging.
- 🤗 Tape and manual adjustments offer a straightforward method for securing the pen's position during use.
- ⚾ The entire process encourages creativity and adaptation based on individual project requirements.
Install to Summarize YouTube Videos and Get Transcripts
Explore YouTube Video Summarizer or Get YouTube Transcript Extractor
Questions & Answers
Q: What applications are needed to start this 3D pen printing project?
The essential applications required include a 2D to STL converter for turning images into 3D models and Cura for slicing. The converter allows users to fine-tune image details and dimensions, while Cura helps manage the printing parameters. Both programs are available for download online, and links are typically provided to ensure easy access for users commencing the printing process.
Q: How do you adjust the settings in the 2D to STL converter?
Within the 2D to STL converter, users can modify the threshold levels to enhance detail and set the target height to match the desired layer height for printing. Adjusting the target size is vital for determining the final print's scale, with an example of 84 mm being suggested for optimal suitability. It's crucial to ensure the settings align with the intended outcome before proceeding to the next steps.
Q: What should you do in Cura to prepare for printing?
In Cura, users need to enable retraction to ensure smooth movement of the pen during drawing. Adjustments should also be made to eliminate any skirts and set appropriate start and end codes. These codes detail how high the print head will start above the surface. Correct configuration allows for efficient printing without the head hitting the paper or dragging across the surface.
Q: How can users position the pen correctly for printing?
To accurately position the pen, users should pause the print after the initial movement, manually adjust it to the desired start point, and tape it down with blue tape. This ensures that the pen remains at the correct height, preventing contact with the surface during the printing process. Fine-tuning this position is essential for achieving clean and precise results.
Summary & Key Takeaways
-
The process begins by converting a 2D image into an STL file using a specialized converter, with settings adjusted for detail and size for 3D printing.
-
Cura is utilized as the slicer software, where users must configure settings like retraction, print height, and commands for optimal results.
-
The final steps involve setting the pen on the printer, pausing the print to align the pen correctly, and then using tape to secure it in place, allowing accurate drawing.
Read in Other Languages (beta)
Share This Summary 📚
Summarize YouTube Videos and Get Video Transcripts with 1-Click
Try YouTube Summary with ChatGPT & Claude or YouTube Transcript Generator
Explore More Summaries from Novaspirit Tech 📚
Summarize YouTube Videos and Get Video Transcripts with 1-Click
Try YouTube Summary with ChatGPT & Claude or YouTube Transcript Generator