How to Measure Air Quality with Arduino Sensors
TL;DR
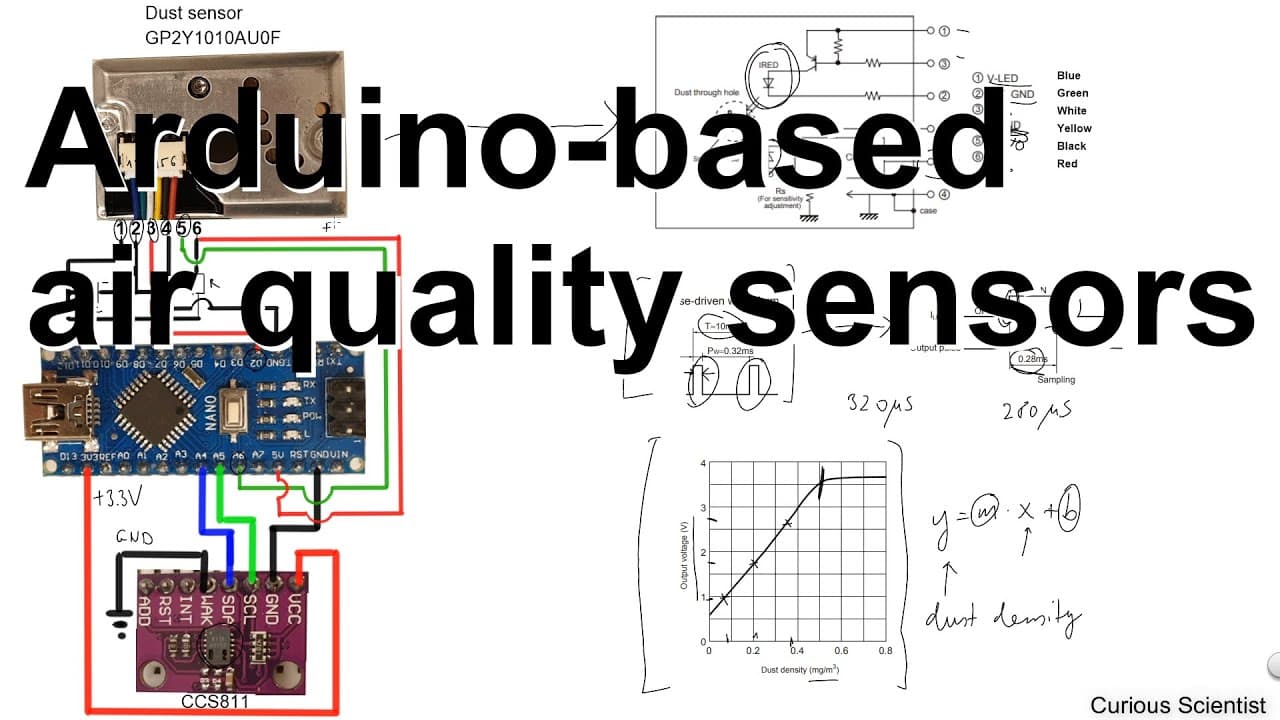
To measure air quality using Arduino, connect a dust sensor and a gas sensor to an Arduino Nano. The dust sensor uses infrared technology to detect airborne particles, while the gas sensor measures CO2 levels and temperature, allowing you to obtain comprehensive air quality readings. Both raw and processed data can be visualized through dedicated software.
Transcript
welcome everyone in this video I'm going to show you how to connect this dust sensor and this gas sensor to an Arduino Nano here I just want to show you that it is connected together on a breadboard and I will show you some drawing where I try to clean up this mess and show all the connections in a better Bay but I just quickly show you what is wha... Read More
Key Insights
- 😴 Correct connection of the sensors to the Arduino Nano is crucial for accurate measurements, requiring attention to pin assignments and voltage specifications.
- 🙂 The dust sensor operates on the principle of light scattering, effectively measuring airborne particulates by analyzing changes in light intensity.
- 🫢 The CCS811 gas sensor not only detects CO2 levels but also tracks temperature, making it versatile for different air quality monitoring applications.
- 👱 The coding structure utilizes libraries to simplify data acquisition from the sensors, making it easier to implement real-time air quality monitoring.
- 👱 Data can be categorized into raw, unprocessed values and averaged results for clearer interpretation of air quality trends.
- 👤 The software developed for visualization enables users to interact with their data, enhancing understanding and analysis through graphical representation.
- 😘 Practical demonstrations, such as blowing on sensors or lighting matches, show the immediate responsiveness and accuracy of the readings.
Install to Summarize YouTube Videos and Get Transcripts
Explore YouTube Video Summarizer or Get YouTube Transcript Extractor
Questions & Answers
Q: What components are required to connect a dust and gas sensor to an Arduino Nano?
You will need an Arduino Nano, a dust sensor, a gas sensor (like CCS811 for CO2 detection), a breadboard, jumper wires, and potentially a capacitor and resistor for the dust sensor connections. The components work together to monitor air quality effectively.
Q: How does the dust sensor measure particulate matter?
The dust sensor utilizes an infrared LED to emit light within a chamber filled with air. Dust particles in the air scatter this light, and the sensor's infrared receiver detects the scattered light, producing an output voltage that corresponds to the dust density present in milligrams per cubic meter.
Q: What type of gas can the CCS811 sensor detect, and how is it calibrated?
The CCS811 sensor primarily detects carbon dioxide (CO2) and can measure it in parts per million (PPM). Calibration involves connecting the sensor to the Arduino, initializing it with a library, and using code to read the CO2 levels, ensuring it compensates for temperature variations through offsets.
Q: How can you visualize the data collected from the sensors?
The data can be visualized using custom software developed by the presenter. This software displays real-time measurements in graph form, providing insights on dust density, CO2 levels, and temperature over time, with options to log and export data for further analysis.
Summary & Key Takeaways
-
The video demonstrates how to connect a dust sensor and gas sensor to an Arduino Nano using a breadboard, emphasizing proper connections and setup instructions.
-
The dust sensor uses infrared technology to measure particulate matter, while the gas sensor primarily detects CO2 levels and temperature, allowing for a comprehensive air quality assessment.
-
Viewers are shown both raw and processed data outputs using specific software for visualization, along with step-by-step circuit explanations and code demonstrations.
Read in Other Languages (beta)
Share This Summary 📚
Summarize YouTube Videos and Get Video Transcripts with 1-Click
Try YouTube Summary with ChatGPT & Claude or YouTube Transcript Generator
Explore More Summaries from Curious Scientist 📚
![Building a Peltier cooler-based cooling box - First iteration, improvements [Part 2/6] thumbnail](/_next/image?url=https%3A%2F%2Fi.ytimg.com%2Fvi%2F0YlNw0EGnzI%2Fhqdefault.jpg&w=750&q=75)


![Building a coil winder [Part 6] - A few improvements thumbnail](/_next/image?url=https%3A%2F%2Fi.ytimg.com%2Fvi%2F3eyxG_g2iUA%2Fhqdefault.jpg&w=750&q=75)


Summarize YouTube Videos and Get Video Transcripts with 1-Click
Try YouTube Summary with ChatGPT & Claude or YouTube Transcript Generator