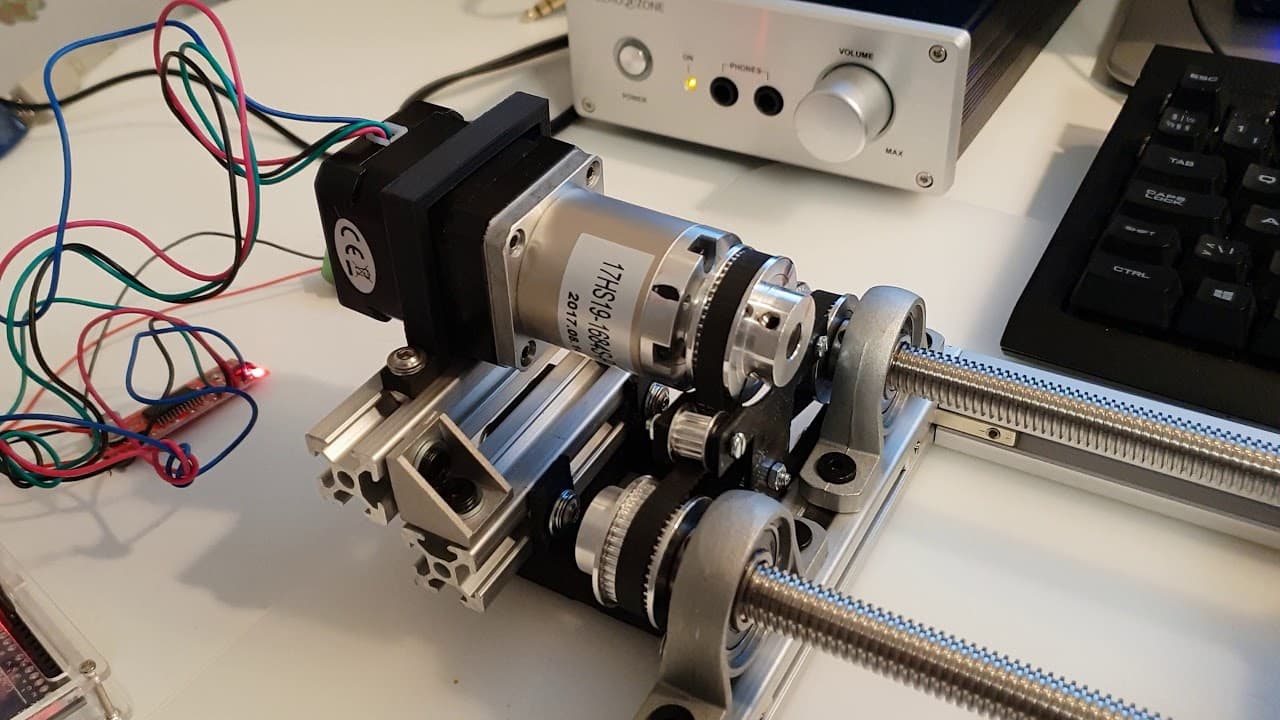
Prototype of the tensile testing machine
TL;DR
The second prototype of a tensile testing machine is enhanced with robust materials and a sophisticated driving mechanism.
Transcript
so this is my second prototype for the tensile testing machine it is more robust and it is more complex than my first it is a bit more advanced in the driving mechanism and it is more robust because I used larger parts for example previously I was using only a single lead screw which had eight millimeters diameter but these guys here have 12 millim... Read More
Key Insights
- 💬 Larger lead screws (12mm diameter) improve the load capacity and durability of the machine, compared to the previous model's 8mm screws.
- 🪛 The mechanically driven system uses timing pulleys and idlers that maintain tension and stability in the belt drive setup.
- 🦻 Incorporating programmable Arduino control offers flexibility in running experiments and collecting data, aiding in test accuracy.
- ❣️ The current design's limitations include the efficiency of plastic components under heavy load; future iterations will utilize metal for increased strength.
- 🤩 Understanding the intricacies of load cell integration is key for accurate force measurement during tensile tests.
- 🥳 Operating with a gear ratio significantly impacts the machine's torque, efficiency, and response time, crucial for precise testing scenarios.
- 🎰 Implementation of more advanced gearing systems, such as helical and spur gears, will enhance the machine's operational capabilities.
Install to Summarize YouTube Videos and Get Transcripts
Explore YouTube Video Summarizer or Get YouTube Transcript Extractor
Questions & Answers
Q: What materials were used in the construction of the new prototype?
The new prototype primarily utilizes PLA for 3D-printed components, such as the crosshead and T-shaped supports. Additionally, aluminum profiles are used, providing structural integrity. The choice of materials was guided by the need for a lightweight but robust design while allowing easy prototyping and modifications.
Q: How does the driving mechanism of the testing machine work?
The driving mechanism features a NEMA 17 stepper motor coupled with a planetary gear system, providing a 1:100 gear ratio. This setup allows for greater torque and control over the crosshead’s movement. The motor is connected to an Arduino for programmable control, facilitating precise adjustments in speed and direction during tensile tests.
Q: What are the benefits of using twin lead screws in future designs?
Including twin lead screws allows for more efficient load management and can significantly reduce the strain on the bearings and overall system. The design also helps mitigate axial loads, enhancing performance. It enables a shorter physical design while offering improved precision and stability during testing.
Q: Why is acceleration considered important in operating stepper motors?
Gradual acceleration is crucial because starting a stepper motor at full speed can cause mechanical stress and instability. Adjusting acceleration rate allows smooth ramp-up to operational speed, preventing potential damage. This technique helps maintain consistent performance and prolongs the life of both the motor and the connected components.
Summary & Key Takeaways
-
The new tensile testing machine prototype features larger lead screws and advanced gear mechanisms, enhancing its overall robustness and functionality compared to the first design.
-
The driving system employs a NEMA 17 stepper motor paired with a 1:100 gear ratio planetary gearbox, optimizing torque and movement control.
-
Future improvements include replacing plastic components with metal parts, utilizing helical and spur gears, and implementing bi-directional lead screws for better load distribution.
Read in Other Languages (beta)
Share This Summary 📚
Summarize YouTube Videos and Get Video Transcripts with 1-Click
Try YouTube Summary with ChatGPT & Claude or YouTube Transcript Generator
Explore More Summaries from Curious Scientist 📚

![Building a Peltier cooler-based cooling box - First iteration, improvements [Part 2/6] thumbnail](/_next/image?url=https%3A%2F%2Fi.ytimg.com%2Fvi%2F0YlNw0EGnzI%2Fhqdefault.jpg&w=750&q=75)


Summarize YouTube Videos and Get Video Transcripts with 1-Click
Try YouTube Summary with ChatGPT & Claude or YouTube Transcript Generator