Cinematic Color Grading In Premiere!

TL;DR
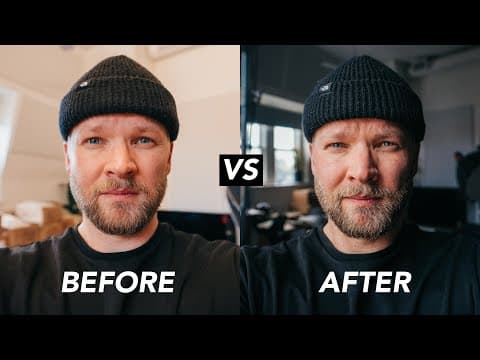
For a cinematic color grade in Premiere, start with a LUT, reduce its intensity, and make subtle adjustments to temperature, tint, contrast, saturation, and color wheels. The example uses the Cinema LUT from the Cine Luts 2.0 pack at about 47%, then carefully protects natural skin tones while creating a moodier image. Read on for the exact workflow and example settings.
Transcript
(dubstep music) - Hey guys, how's it going? Welcome to another tutorial, and this one's gonna be all about color grading. I get a ton of comments and questions saying that they like the color grades that I do, asking how I do color grades and I've been trying to figure out how can I show more of that? How can I give you guys more, 'cause at least f... Read More
Key Insights
- 🎮 Color grading is a vital aspect of video production, enhancing the visual appeal and storytelling of footage.
- 👀 Starting with a LUT can streamline the process, providing a foundation that can be customized to achieve a unique look.
- 🥌 Subtlety is crucial in color grading; avoiding excessive saturation and maintaining natural skin tones contributes to a cinematic aesthetic.
- ❓ Experimentation and practice are essential for improving color grading skills and developing a personalized style.
- 👀 Understanding the intricacies of temperature, contrast, and color balancing can significantly impact the final look of a video.
- 👻 Utilizing tools like three-way color correctors allows for creative control and fine-tuning of the color grade.
- 🥌 Paying attention to details like skin tone adjustment and avoiding over-correction can elevate the overall quality of the color grade.
Install to Summarize YouTube Videos and Get Transcripts
Explore YouTube Video Summarizer or Get YouTube Transcript Extractor
Questions & Answers
Q: How do you create a cinematic color grade in Premiere?
Start in the Creative tab by choosing a LUT as the foundation, then reduce its intensity until the effect looks natural rather than distracting. Fine-tune temperature, tint, highlights, shadows, whites, saturation, and the three-way color correctors to suit the footage.
Q: Why should you start color grading with a LUT?
A LUT provides a ready-made foundation and saves time compared with starting from scratch or repeatedly making the same adjustments. The creator also tests other people's LUTs to study how they manipulate footage and incorporate useful ideas into his own workflow.
Q: How strong should a LUT be for a cinematic look?
The LUT should be restrained enough that the grade does not look heavy or distract the audience. In the demonstrated clip, the creator lowers the Cinema LUT from his Cine Luts 2.0 pack to around 47% because its initial effect is far too strong.
Q: What example temperature and tint settings are used?
Because the image looks too blue, the temperature is raised to about 18 or 19. To add more green and reduce magenta, the tint is brought down to around minus six.
Q: How are highlights, shadows, and whites adjusted in the example?
The highlights are lowered to around minus 55 to darken the bright sky and restore the mood felt during filming. Shadows are raised to around 20 to recover darker detail, while whites are increased to 10 to add contrast in the brightest parts of the image.
Q: How should saturation be adjusted for a subtle cinematic grade?
Avoid pushing saturation so far that the grade becomes obvious or unnatural. In this example, the footage appears slightly too saturated, so saturation is reduced to around 95.
Q: How are three-way color correctors used in this workflow?
The three-way color correctors are used to refine contrast and add creative color adjustments. The creator slightly lowers the shadows for a moodier look, raises the mid-tones to retain detail, and moves the highlights wheel subtly toward orange to create color contrast in the sky.
Q: Why do skin tones require special care when color grading?
Skin tones need subtle treatment because viewers can immediately notice when they are not accurate. The goal is a grade that remains natural while still feeling cinematic, rather than one that looks heavily processed.
Summary & Key Takeaways
-
The content dives into the importance of color grading, emphasizing the impact it has on enhancing footage aesthetically.
-
Starting with a LUT as a foundation saves time but custom tweaking is crucial for a unique, cinematic look.
-
Subtlety is key; adjusting temperature, contrast, and skin tones delicately elevates the overall quality of the color grade.
Read in Other Languages (beta)
Share This Summary 📚
Summarize YouTube Videos and Get Video Transcripts with 1-Click
Try YouTube Summary with ChatGPT & Claude or YouTube Transcript Generator
Explore More Summaries from Matti Haapoja 📚

Summarize YouTube Videos and Get Video Transcripts with 1-Click
Try YouTube Summary with ChatGPT & Claude or YouTube Transcript Generator