How to Set Up Canon PowerShot V1 for YouTube
TL;DR
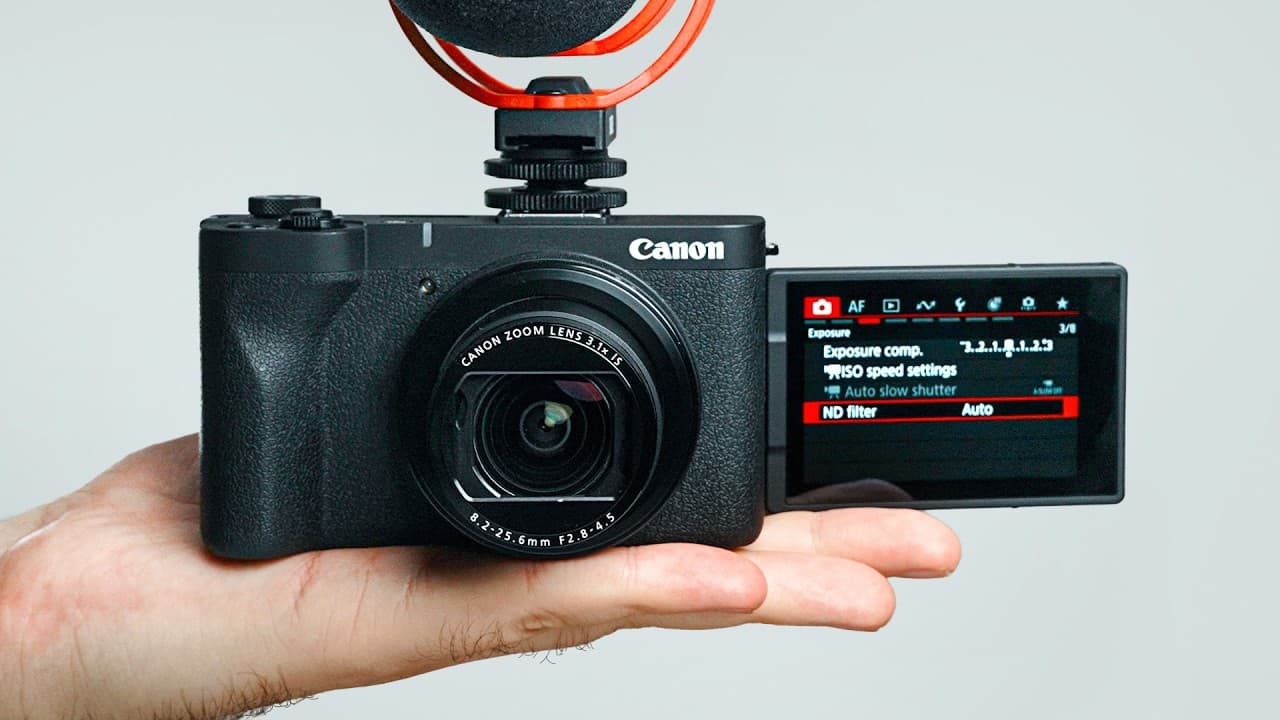
Set the Canon PowerShot V1 to movie mode with manual control, choose 4K at 24 or 30 frames per second, and match shutter speed to 1/50 or 1/60. For controlled indoor recording, lock exposure, white balance, and audio levels; for vlogging, use automatic ISO and ND filtering to handle changing conditions more easily.
Transcript
The Canon PowersShot V1 is a powerful little camera designed for content creation, but to get the most out of it, you need the right settings. So, in this video, I'll walk you through the best settings for vlogging, talking head videos like this, and even slow motion. So, grab your PowersShot V1, and let's dive in. You got to just press record. Bef... Read More
Key Insights
- Movie recording mode with manual control is the recommended starting point for configuring the Canon PowerShot V1. The camera defaults to Full HD at 30 frames per second, while the available options discussed include standard or light 4K recording at 24 or 30 frames per second.
- The auto power-off temperature setting can affect long recordings. Setting it to high reduces the risk of an automatic shutdown, although the camera may become warmer to the touch. The built-in cooling fan should be set to auto so it operates when cooling is needed.
- A freshly formatted SD card helps ensure recordings are stored properly. A low-level format deletes everything already on the card, so the card should contain no files that need to be preserved before this menu command is used.
- Shutter speed should be approximately twice the selected frame rate. The recommended settings are 1/50 for recording at 24 frames per second and 1/60 for recording at 30 frames per second, producing consistent motion rendering under the demonstrated setup.
- Manual exposure is useful for controlled talking-head recordings because brightness remains consistent throughout the shot. A low aperture admits more light and creates a shallower depth of field, while a locked ISO prevents automatic exposure changes as the camera continues recording.
- White balance should match the recording situation. Automatic white balance is convenient for vlogging, while a fixed Kelvin value or custom reading prevents color shifts indoors. A gray card or white paper can provide the reference image required for a custom white balance.
- Canon Log 3 is the camera's route to 10-bit video and offers the greatest color-grading potential described in the guide. View Assist provides a graded-looking preview, while regular picture styles produce 8-bit footage that is considered sufficient for most vlogging and content creation.
- External microphone levels should be controlled manually to avoid audio that is too loud or too quiet. The guide targets the displayed 12 region near the green indicator, recommends headphone monitoring, and suggests choosing wind filtering and noise reduction according to the recording environment.
- Related book: YouTube Secrets
Install to Summarize YouTube Videos and Get Transcripts
Explore YouTube Video Summarizer or Get YouTube Transcript Extractor
Questions & Answers
Q: How do I set up the Canon PowerShot V1 for YouTube videos?
Begin with a fully charged battery and an SD card that can safely be erased. Switch the camera to movie recording mode and M for manual control. Choose 4K at either 24 or 30 frames per second, keep the recording quality on standard, set the cooling fan to auto, format the card, and then configure exposure, white balance, color, and audio for the shooting environment.
Q: What recording resolution and frame rate should I use on the Canon PowerShot V1?
The camera defaults to Full HD at 30 frames per second, but the guide selects 4K for higher image quality. Available choices discussed include 4K at 24 frames per second and 4K at 30 frames per second, with standard and light modes. Standard is recommended because it provides a little higher image quality than the light option.
Q: What shutter speed should I use for 24 or 30 frames per second?
Set shutter speed to roughly twice the selected frame rate. For 24 frames per second, use 1/50 because it is close to 1/48. For 30 frames per second, use 1/60. These settings are presented as the appropriate starting points after selecting the movie recording size and frame rate in the camera menu.
Q: How should I expose a talking-head video with the PowerShot V1?
Use manual exposure when recording in a controlled studio so the lighting does not change during the shot. Set the shutter speed according to frame rate, open the aperture as low as possible to admit more light and blur the background, then adjust and lock ISO for the current lighting. ISO 400 worked in the demonstrated environment, but the correct value depends on the lighting setup.
Q: How do I set white balance on the Canon PowerShot V1?
Automatic white balance is convenient when vlogging because it adjusts as conditions change. In a fixed indoor setup, manually enter the color temperature so the camera does not shift colors during recording. The demonstrated light was set to 5600 Kelvin. For greater accuracy, photograph a gray card or white paper under the recording lights and use that image for a custom white balance.
Q: Should I use Canon Log 3 or a normal picture style?
Canon Log 3 provides the greatest color-grading potential described in the guide and is the only stated way to record 10-bit video with this camera. Turning on View Assist gives the display a preview resembling the graded result. A normal picture style records 8-bit video, which is described as sufficient for most vlogging and content creation. Neutral offers a more natural starting image.
Q: How do I set external microphone levels on the PowerShot V1?
Connect an external microphone, display the audio meters with the Info button, and open the external microphone settings under sound recording. Change input control to manual, then lower or raise the input until speech lands around the displayed 12 region near the green dot. Before recording, connect headphones and listen for excessive volume, weak sound, clothing rustle, or other unwanted noise.
Q: What settings should I use for vlogging with the Canon PowerShot V1?
For fast-moving vlog recording, keep more exposure functions automatic. Set the ND filter to auto so it engages when the scene becomes bright, and leave ISO on automatic to respond to changing light. Use exposure compensation only for modest overall corrections, generally between negative 1 and plus 1. Enable at least the first digital stabilization option, with enhanced stabilization available for especially shaky handling.
Summary & Key Takeaways
-
Start with a fully charged battery and an SD card whose contents can be deleted. Select movie mode and manual control, choose a standard 4K recording option, set the auto power-off temperature to high, format the card, configure the cooling fan to auto, and adjust screen brightness for the environment.
-
For a consistent talking-head image, use 1/50 shutter at 24 frames per second or 1/60 at 30 frames per second. Open the aperture as wide as practical, lock ISO for stable studio exposure, manually match white balance to the light, and select Neutral or Canon Log 3 according to editing needs.
-
Improve sound by connecting an external microphone, selecting manual input control, and adjusting levels near the displayed 12 region. Monitor through headphones before recording. For mobile vlogging, simplify operation with automatic ISO and ND filtering, modest exposure compensation, and digital stabilization to accommodate changing light and handheld movement.
Read in Other Languages (beta)
Share This Summary 📚
Summarize YouTube Videos and Get Video Transcripts with 1-Click
Try YouTube Summary with ChatGPT & Claude or YouTube Transcript Generator
Explore More Summaries from Think Media 📚



Summarize YouTube Videos and Get Video Transcripts with 1-Click
Try YouTube Summary with ChatGPT & Claude or YouTube Transcript Generator