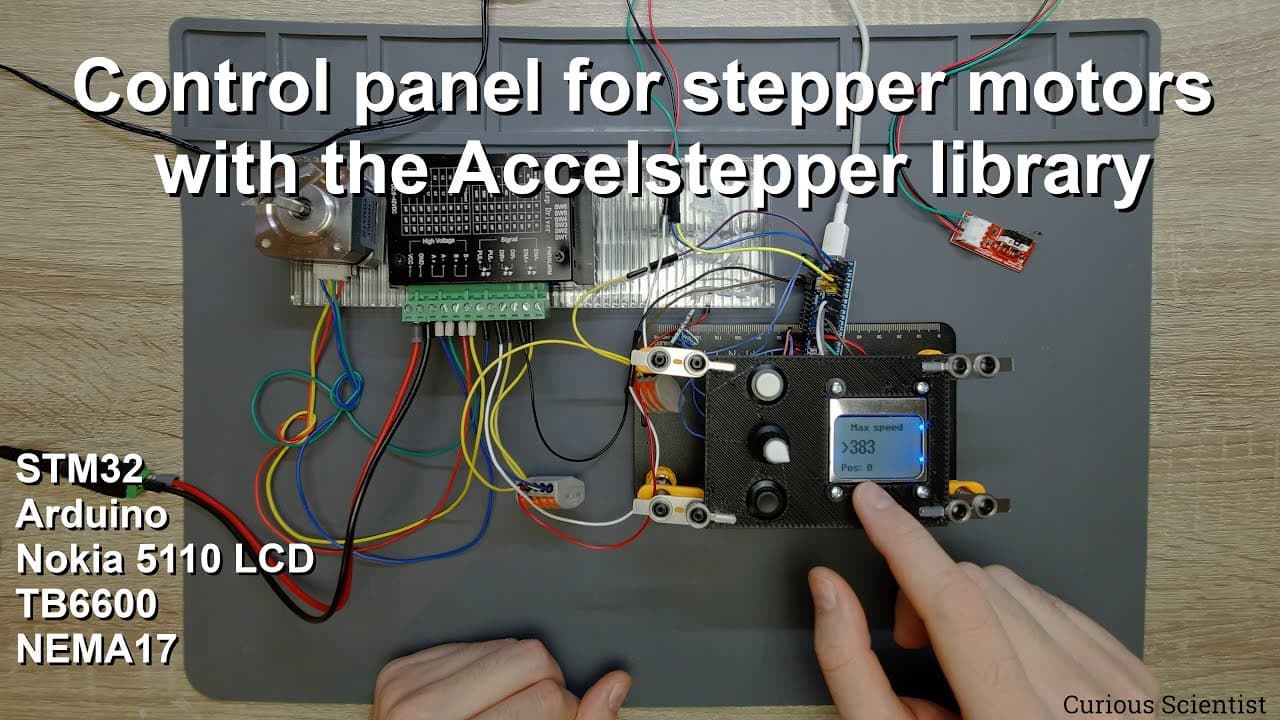
Control panel for stepper motors using the Accelstepper library
TL;DR
Learn to control a stepper motor using buttons and a rotary encoder instead of a computer.
Transcript
welcome everyone in this video i'm going to show you another stepper motor based project in one of my previous video i showed you how to control the stepper motor using these components from the computer so you could set the speed the relative or absolute movement and so on and so on and you could send commands from the computer to control the step... Read More
Key Insights
- 🧑🦼 Using a microcontroller with physical inputs simplifies stepper motor control and increases portability.
- 🧑🦼 The stepper motor setup eliminates reliance on computers, making it suitable for environments where mobility is needed.
- 🧘 Visual feedback via the Nokia 5110 LCD improves user experience by displaying real-time speed and position data.
- 🙅 Limit switches serve a critical safety function by automatically halting the motor when boundaries are reached.
- 👤 The project encourages user modifications to enhance functionality, fostering creativity in electronics design.
- 👻 The rotary encoder’s incremental adjustment capability allows for granular control over motor operations.
- 🎮 Adjusting the step size is essential for optimizing control precision, especially in applications requiring fine movements.
Install to Summarize YouTube Videos and Get Transcripts
Explore YouTube Video Summarizer or Get YouTube Transcript Extractor
Questions & Answers
Q: Why did the creator switch from using a computer to buttons and a rotary encoder for this project?
The transition to buttons and a rotary encoder provides a more straightforward and portable method for controlling the stepper motor. This setup allows precise adjustments without requiring a full computer system, making the project more accessible and practical for various applications.
Q: What are the main components used in this stepper motor project?
The main components include a NEMA 17 stepper motor, a TB6600 motor controller for signal management, an STM32 Bluepill microcontroller for processing commands, buttons for user input, a rotary encoder for fine adjustments, and a Nokia 5110 LCD to display critical information and settings.
Q: How does the rotary encoder function in this project?
The rotary encoder allows users to navigate through the menu options and adjust motor settings. Each click of the encoder translates to a specific increment or decrement in values like speed and step size, enhancing user interactivity and control over the stepper motor's operation.
Q: What precautions are implemented to ensure safe operation of the stepper motor?
The project incorporates limit switches to stop the motor automatically if it exceeds set boundaries. This feature prevents mechanical damage or overheating by ensuring that the motor does not attempt to move beyond its physical limits, promoting safe and reliable operation.
Q: Can users modify the source code and components for different projects?
Yes, users are encouraged to modify the provided source code and components to suit their specific needs. The creator provides the source code and detailed instructions available in the video description, allowing for customization based on various applications.
Q: What limitations did the creator mention regarding the speed of the stepper motor?
The creator noted that screen refresh rates could potentially limit the motor's speed. The time required to update the LCD may elongate the interval between steps, leading to slower motor movement than intended, especially when updating during high-speed operations.
Q: Why does the project focus on setting a "new origin" for the stepper motor?
Establishing a new origin allows users to redefine the motor’s starting position, enhancing the accuracy of relative movements. This feature is crucial in applications requiring precise control, as it enables the system to function based on the user's defined coordinate system.
Summary & Key Takeaways
-
This video demonstrates a stepper motor project using an STM32 microcontroller, buttons, and a rotary encoder for manual control, eliminating the need for a computer.
-
Key components include a NEMA 17 stepper motor, TB6600 motor controller, rotary encoders, buttons, and a Nokia 5110 LCD for displaying controls and motor status.
-
The project emphasizes precision and simplicity, allowing users to set speed, step size, and positions directly through a control panel interface.
Read in Other Languages (beta)
Share This Summary 📚
Summarize YouTube Videos and Get Video Transcripts with 1-Click
Try YouTube Summary with ChatGPT & Claude or YouTube Transcript Generator
Explore More Summaries from Curious Scientist 📚


![Building a coil winder [Part 6] - A few improvements thumbnail](/_next/image?url=https%3A%2F%2Fi.ytimg.com%2Fvi%2F3eyxG_g2iUA%2Fhqdefault.jpg&w=750&q=75)


Summarize YouTube Videos and Get Video Transcripts with 1-Click
Try YouTube Summary with ChatGPT & Claude or YouTube Transcript Generator