How-To Draw Graffiti in 3D
TL;DR
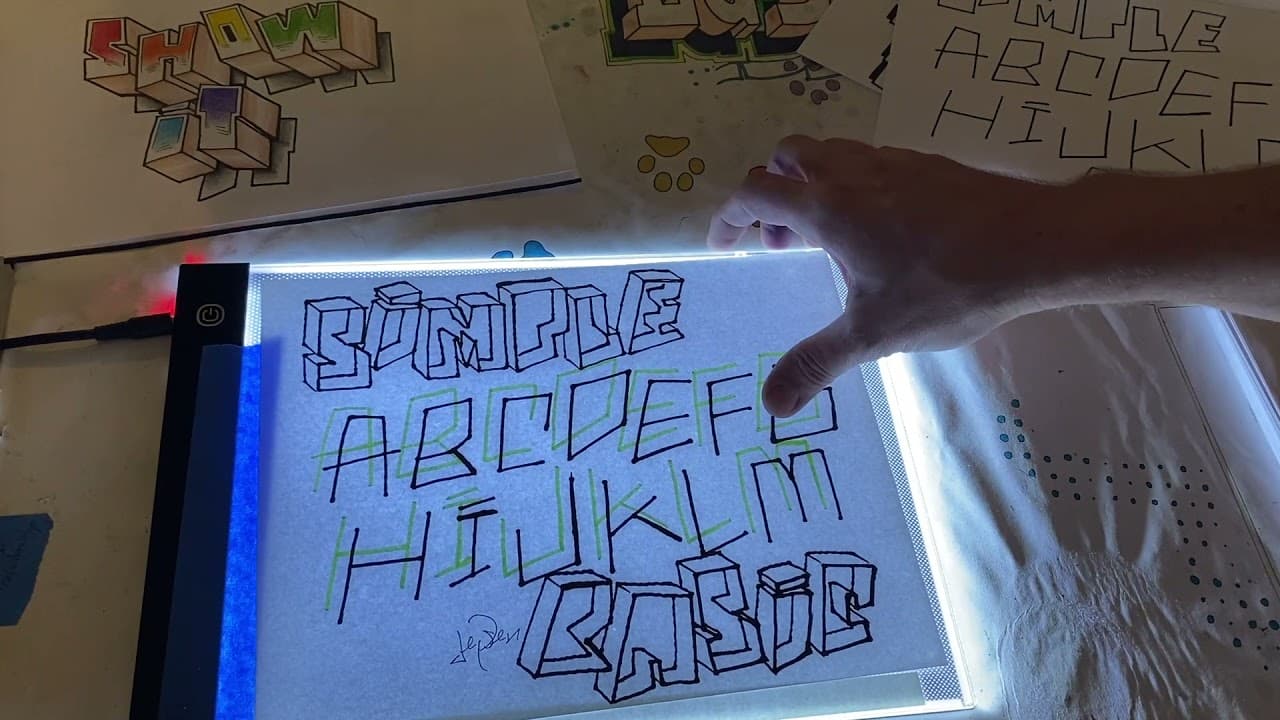
3D graffiti letters are made by tracing a flat letter design, shifting the copy to a chosen angle, and connecting corresponding points to create depth. The tutorial uses a light board, markers, transparent paper or Xerox paper, and repeated practice sheets. It also explains how to keep obstructed areas solid instead of transparent, so read on for the complete step-by-step method.
Transcript
hi how to festival 2021 this is legible graffiti where i'm going to show you how to do three-dimensional graffiti letters from flat writing we'll take something similar to this and we'll have fun with it based on flat shapes that will sculpt into 3d like even your logo how to festival 2021 welcome we're gonna turn 2d into 3d using legible graffiti ... Read More
Key Insights
- 💌 Legible graffiti focuses on making graffiti letters easily readable and comprehensible.
- 💌 The process of creating 3D graffiti involves finding the right angle and sculpting the letters in a three-dimensional manner.
- 🙂 A light board, markers, and lots of paper are essential supplies for creating 3D graffiti.
- 🖐️ Playing with different angles and incorporating shadows can add depth and complexity to 3D graffiti designs.
- 🤩 Practice is key to improving and mastering the technique of creating 3D graffiti.
- 🎨 Legible graffiti offers a wide range of design possibilities and allows artists to have fun and experiment with their creations.
- ⌛ The process of transferring the original design onto another sheet of paper is time-consuming but important for creating the final 3D effect.
Install to Summarize YouTube Videos and Get Transcripts
Explore YouTube Video Summarizer or Get YouTube Transcript Extractor
Questions & Answers
Q: How do you make 3D graffiti letters?
Start with flat letters, trace the original design onto another sheet, and align both copies over a light source. Shift the copy to an angle you like, then connect its points to the corresponding points on the original like a three-dimensional dot-to-dot drawing.
Q: How do you create a graffiti 3D effect from flat writing?
Duplicate the outer shapes or letters, move the copy away from the original at a consistent angle, and connect the matching corners. The resulting connecting lines sculpt the flat writing into a three-dimensional form on paper.
Q: What supplies are needed for this 3D graffiti tutorial?
The tutorial calls for a light board, markers, and lots of paper. The markers can be permanent markers, watercolor markers, highlighters, crayons, or colored pencils, and the light source can also be a light box or window.
Q: Why is a light source important for drawing 3D graffiti?
A light source lets you see the original design beneath another sheet of paper. This makes it possible to align, trace, shift, and connect the duplicated shapes accurately.
Q: How do you choose an angle for 3D graffiti letters?
Line the traced copy up with the original, then move it until you find an angle you like. Keep the connecting lines aligned with that chosen direction so the letter has a consistent three-dimensional form.
Q: How should overlapping parts of a 3D graffiti letter be handled?
Stop a connecting line when another part of the letter obstructs it. Drawing through the obstruction would make the form look transparent, while leaving the hidden connection out keeps the area solid.
Q: Can basic font letters be turned into 3D graffiti?
Yes, the demonstration begins with a simple basic font and copies its letters onto another sheet. The copied letters are shifted and connected to the originals to produce the 3D shape.
Q: How can you protect a light board while using permanent markers?
Place a clear transparency sheet over the light board before drawing. It catches stray permanent-marker marks that might not come off the board, allowing the light board to be used repeatedly.
Summary & Key Takeaways
-
The video tutorial demonstrates how to turn 2D graffiti letters into 3D designs using flat shapes.
-
The process involves finding the angle of the letters and sculpting them in a 3D manner on paper.
-
The technique requires a light board, markers, and lots of paper.
Read in Other Languages (beta)
Share This Summary 📚
Summarize YouTube Videos and Get Video Transcripts with 1-Click
Try YouTube Summary with ChatGPT & Claude or YouTube Transcript Generator
Explore More Summaries from San Diego Public Library 📚




Summarize YouTube Videos and Get Video Transcripts with 1-Click
Try YouTube Summary with ChatGPT & Claude or YouTube Transcript Generator