How to Share State Between React Routes After Form Submission?

TL;DR
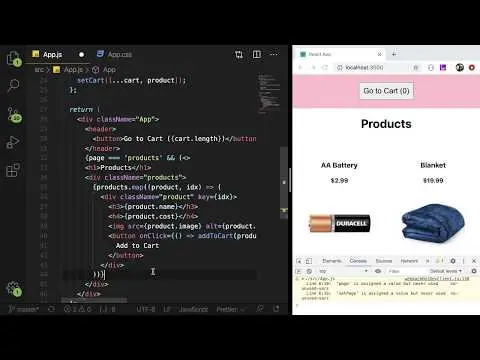
To share state between React routes after a form submission, create a higher-level state in the parent component using useState. Pass a setter function to the child component that processes the form data, allowing it to set this state. Then, navigate to the success page, where the higher-level state can be accessed and displayed.
Transcript
hey guys so i um someone on my discord kind of asked me if i could explain how do you do a request on one page intel react to redirect with the data that you got back on your form submission and display that on another page right so he's using react router version 6 and create react app so i'm going to kind of walk you through how i will kind of do... Read More
Key Insights
- 🫥 Utilizing a high-level state allows for effective data sharing between sibling components in a React application.
- 😫 Using React Router, developers can easily set up navigation between different components based on URL paths and manage form submission results.
- 💗 The tutorial emphasizes the importance of state management as applications grow in complexity, making explicit the need for organized data handling.
- 🔠 The process of using promises to manage asynchronous API requests is integral to the tutorial, as it helps in transitioning smoothly from data acquisition to display.
- 👻 Higher-order functions like
useNavigateallow developers to programmatically navigate between routes in a React Router setup, enhancing user experience. - ❓ Although prop drilling is discussed as an initial method, it is important to recognize when more advanced state management solutions should be used for scalability.
- 👋 Best practices for React development, such as keeping state at a higher level, can simplify component interaction and ensure data integrity across views.
Install to Summarize YouTube Videos and Get Transcripts
Explore YouTube Video Summarizer or Get YouTube Transcript Extractor
Questions & Answers
Q: What is the goal of the tutorial?
The goal of the tutorial is to demonstrate how to handle form submissions in a React application and display the returned data on a different page using state management techniques. The focus is on enabling users to navigate to a success page while retaining the data relevant to that action.
Q: How do you set up routing using React Router version 6?
Routing in React Router version 6 is set up by importing the BrowserRouter and creating a Routes component that contains Route elements. Each route associates a URL path with a specific component to render, allowing users to navigate between different views of the application seamlessly.
Q: What is prop drilling, and how is it used in this tutorial?
Prop drilling is the process of passing data down through multiple layers of components via props. In this tutorial, prop drilling is used to pass the state's setter function from the top-level app component to the buy component, allowing it to store the returned data in the shared state.
Q: What alternative approaches to state management does the video mention?
The video mentions using tools like context or Redux as alternative state management solutions for sharing data across components. It highlights that while these methods can be effective, the simplest approach for beginners involves using a higher-level state with prop drilling.
Summary & Key Takeaways
-
The tutorial covers how to manage state in a React application using React Router version 6, focusing on sharing data between components after a form submission.
-
It explains the process of creating a higher-level state in the app component to store data returned from a backend API, which can be used in multiple child components.
-
The video also discusses the methods of navigating to a new route after data submission and how to pass the data to the success component for display.
Read in Other Languages (beta)
Share This Summary 📚
Summarize YouTube Videos and Get Video Transcripts with 1-Click
Try YouTube Summary with ChatGPT & Claude or YouTube Transcript Generator
Explore More Summaries from Web Dev Cody 📚


Summarize YouTube Videos and Get Video Transcripts with 1-Click
Try YouTube Summary with ChatGPT & Claude or YouTube Transcript Generator