This tool makes self hosting simple
TL;DR
A step-by-step guide to self-hosting Next.js applications using Coolify on a VPS.
Transcript
so whenever I talk about hosting people always seem to comment and say I should try out coolify and that is what I managed to do in my spare time is I checked out coolify I spun up a VPS I installed it and I was able to host one of my nextjs applications using it so this video is going to be more of a walkthrough of how you can do this yourself and... Read More
Key Insights
- 👻 Coolify is an accessible platform for hosting applications on a VPS, suitable for both beginners and experienced developers.
- ❓ Proper VPS setup is crucial for successful Coolify installation, requiring a minimum of two CPUs and adequate memory and storage.
- 👨🦱 The installation of Coolify involves running a simple curl command, streamlining the startup process for users.
- 👤 Users can manage their projects and deployments through a user-friendly dashboard, enhancing productivity and organization.
- 👻 Coolify supports integration with GitHub, allowing for efficient version control and deployment of applications directly from repositories.
- 👤 Users can configure domain settings via Cloudflare or other services, facilitating easy access to their deployed applications.
- 🤙 The deployment process leverages a library called Nyx packs, enhancing the building and management of Next.js applications.
Install to Summarize YouTube Videos and Get Transcripts
Explore YouTube Video Summarizer or Get YouTube Transcript Extractor
Questions & Answers
Q: What are the minimum requirements for hosting Coolify?
To host Coolify, users must ensure their VPS meets the minimum requirements: at least 2 CPUs, 2 GB of RAM, and 30 GB of storage. These specifications are necessary for building and hosting containers effectively. Insufficient resources may lead to deployment issues or incomplete installations.
Q: How do I install Coolify on a VPS?
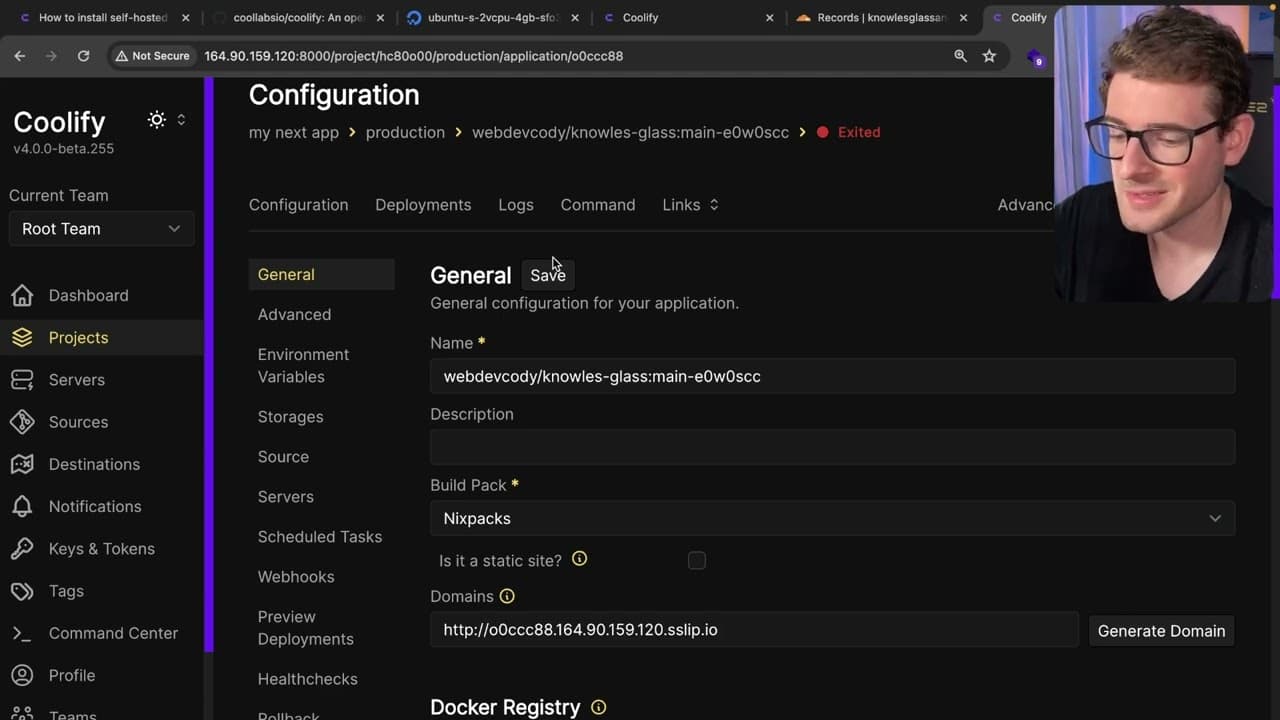
To install Coolify, users first need to set up a VPS and SSH into it. Then, they should copy the curl command from the Coolify website and execute it in the terminal. It may take a few attempts if the system is booting. Once installed, users can access the Coolify dashboard via their VPS IP address to proceed with setup.
Q: Can I deploy applications from public Git repositories using Coolify?
Yes, Coolify allows users to deploy applications directly from public Git repositories. During the setup process, users can specify the URL of their GitHub repository. Coolify integrates with various deployment libraries to facilitate the build and deployment of applications seamlessly.
Q: What additional features does Coolify offer for managing applications on VPS?
Apart from simple application deployment, Coolify enables users to manage multiple remote servers from its dashboard. Users can also add databases, such as MySQL or Redis, without significant effort, making it a powerful tool for comprehensive VPS management.
Summary & Key Takeaways
-
The video walks viewers through the process of self-hosting a Next.js application using Coolify, emphasizing its simplicity and accessibility.
-
To begin, users need a Virtual Private Server (VPS) with minimum specifications including 2 CPUs, 2 GB of RAM, and 30 GB of storage.
-
The process involves creating a VPS, installing Coolify via a curl command, and deploying the application through the Coolify dashboard by connecting to a GitHub repository.
Read in Other Languages (beta)
Share This Summary 📚
Summarize YouTube Videos and Get Video Transcripts with 1-Click
Try YouTube Summary with ChatGPT & Claude or YouTube Transcript Generator
Explore More Summaries from Web Dev Cody 📚


Summarize YouTube Videos and Get Video Transcripts with 1-Click
Try YouTube Summary with ChatGPT & Claude or YouTube Transcript Generator